4L60E to T56 conversion instructions for 1994-1997 LT-1
written by Alex Afrashteh - last modified 08/02/2013
A modified version of this document that applies to LS1's has been made by Jesse (SSnakekiller @ ls1tech.com) - please click here for the PDF document.
Converting from an auto to a manual is not actually that difficult. The factory parts do fit in place, and all
the wiring is basically there. These instructions should be the most concise there is on the internet. I'll break it all
up to make it easier for all to use. I have a lot of pictures that can be viewed to help you with the swap - go
here for pictures.
Parts
This is actually 50% of the battle. I highly recommend you buy a complete
conversion kit. Places to try are
www.speedautomotive.com,
www.billygrahamsfirebird.com, and
www.lambertsalvage.com. (Update - please note, most are probably no longer
in business) Most kits go for $1,500. Here is a list of
necessary parts :
- T56 transmission, bellhousing, slave cylinder extension piece, clutch fork, fork t-stud, inspection cover, shifter, flywheel, pressure plate w/throwout bearing, clutch disk, clutch alignment tool.
- master cylinder with U-bolt, slave cylinder, reservoir
- new roller pilot bearing
- T56 tranny crossmember, tranny mount (can use A4 tranny mount - recommend LS1/1LE tranny mount)
- exhaust mount, torque arm bracket, torque arm bushing (can use A4 TA bushing)
- pedal assembly with all the switches and clip for clutch pedal
- shifter console insert (replaces automatic shifter insert)
- lower shift boot
- bolts - bellhousing to tranny, flywheel, pressure plate to flywheel, slave cylinder nuts, master cylinder U-bolt nuts, inspection cover screws, lower shift boot screws.
CAGs pigtail (not necessary), VSS pigtail (12101899), reverse lockout pigtail (12101857), reverse light pigtail (12085485). The pigtails are expensive, but necessary.
Connectors for the pedals are not necessary.
- 4 quarts of Dexron III
- brake fluid if necessary
Here is very detailed list with part numbers from user 89buicklesabre posted @ f-bodyhideout.com (note that most of this should come from the place you got the kit) :
- Quantity Part # Part Description Price per unit
- 1 10267518 Transmission Boot Underbody (seals $24.18 around shifter coming through car)
- 7 11509709 Sheet metal screws for underbody boot cover
- 1 12101899 Vss Pigtail
- 1 12101857 Reverse Lockout Pigtail $10.76
- 1 12085485 Reverse Light Pigtail $10.40
- 4 12337828 Screws for flywheel cover $0.37
- 1 10241153 cover for flywheel (dust shield AKA flywheel access panel)
- 6 12337973 bolt for flywheel $1.34
- 6 10079898 bolt for pressure plate to flywheel $1.78
- 6 10198997 bolt for bell housing to engine $0.43
- 1 12559912 master/slave clutch cylinder $98.24
- 2 11506117 nut for slave cylinder M8x1.25/with washer
- 1 10121502 retainer for clutch reservoir $0.17
- 1 14076942 u-bolt for clutch master cylinder
- 2 11515748 nut for u-bolt M8x1.25/with washer
- 2 11500323 washer for nut for u-bolt $0.37
- 1 10284835 bracket for catalytic converter
- 1 10261946 torque arm for 6speed trans $86.11
- 1 10252375 bracket for torque arm $14.23
- 1 11500046 washer for torque arm $0.37
- 1 11500930 bolt for torque arm bracket $1.01
- 1 11504745 bolt for torque arm bracket M10x1.5x8x40
- 1 10252374 bracket for torque arm $20.68
- 2 10255857 nut for torque arm bracket $1.28
- 1 10228254 shift plate/console for 6 speed
- 2 22570841 bolt for transmission mount M10x1.5x30
- 1 10198322 Transmission crossmember $24.18
- 4 11515946 bolt for transmission crossmemeber $2.42
- 1 10255857 nut for transmission mount $1.28
- 1 3790768 washer for transmission mount $0.78
I highly recommend you get a new clutch and pressure plate. Deciding on a clutch and pressure plate combo really depends
on your power levels. Clutches available are - GM stock, Centerforce, STAR, McLeod, SLP, and others. The most popular
clutches right now are the Street Twin and STAR clutch Stage II and III. From what I have heard, Centerforce is junk,
the Street Twin is difficult to setup, the STAR clutch can be grabby/chatter, and the SLP clutch can only handle so
much power - so you can't always win. :) Do not forget, the flywheel most be resurfaced and balanced the same as your
flexplate (or neutral balanced if you have an internally balanced/built motor).
Disassembly
First things first, the car must be jacked up. Get the car as high as you can, front and back. Remember, if you don't have
the car high enough, you will not be able to get the automatic out from under the car! Be sure everything is very secure,
you need to feel confident as you will be under the car a lot.
Inside :
- Remove both seats.
- Remove the shift knob - there is a staple in the front that must be pulled to remove it.
- Remove all the bolts, and pull the entire console assembly. The parking brake should be pulled up hard and fast to
make it point straight up.
- Remove the shifter assembly (disconnect park/neutral switch connector), disconnect the shift cable to the tranny.
- Remove knee bolster and plastic piece (disconnect rear defogger connector)
- Remove steering knuckle and steering column. A bunch of wires need to be disconnected. There are three bolts in the
frame and two big bolts that hold the column. There will be a plastic line with a metal wire in it that connects the
shifter assembly to the steering column - this is the mechanism that prevents the key from being turned unless the car
is in park - remove it.
- Remove the pedal assembly. There should be a couple electrical connections. The throttle cable is easy to get off.
The brake pedal has a clip that holds the brake rod on, remove it and hold on to it.
Outside :
- Disconnect your y-pipe and O2's.
- Unbolt and remove the torque arm. If you are finding it difficult to get it out of the TA bushing, put a bolt in the
differential and one in the TA. Use them to pry it out of the bushing - works like a charm.
- Unbolt the drive shaft from the pinion yoke. If you have a tranny plug, plug the auto. If you do not, leave the drive
shaft in the back of the tranny.
- Remove the dust shield and unbolt all the torque converter bolts. The flexplate has to be turned to do this, use the
frame/starter/whatever to turn the wheel (and hold it in place) with a large screw driver or pry bar. Push the TC into the
tranny as far as it will go.
- Get a hydraulic jack underneath the pan - be sure it is placed in such as way that the weight is evenly spread and the
tranny will not fall when completely disconnected. The jack should be positioned from front to back. Jack it until it
relieves pressure from the tranny mount. Don't lift the car. :)
- Unbolt the tranny mount and remove the tranny crossmember.
- Lower the tranny a couple inches and remove all the electrical connectors and wires. Also, pull the dipstick and the
tranny cooler lines.
- Lower the tranny as much as you feel comfortable. Be sure you are not damaging anything - be aware of wiring, header
interference, whatever. The point here is to have access to the top four tranny bolts.
- With very long extensions and swivel joints, remove all but the easiest tranny bolts (bottom two). They can be very
difficult to break, I recommend you use a long metal tube to slide over the handle of your ratchet - it will provide
excellent leverage.
- Once all the bolts (but the bottom ones) are out, raise the tranny so it is almost straight - remove the last two
bolts. Do not worry about it just falling, there are guide pins that will hold it together. Gently pry the tranny off the
engine while keeping everything balanced. You should also hold the TC. Drop the auto as far as you can on the jack and then remove the TC (be positioned correctly, it is heavy). At this point, you will need to take the auto off the jack and lay it on the floor. Of course, keeping it straight will help prevent loss of fluid. Having cardboard on the ground helps a lot to slide it from under the frame. Congrats, one of the hardest parts is done.
- Remove the flexplate bolts and pull the flexplate. The bolts are going to be on there good, so be prepared to hold the
flexplate in place and use leverage to your advantage. If you are going to use an air tool, get a perfect fit 6 point
socket and be sure to be on that bolt good when you hit it.
- Do not lose the crossmember bolts, tranny to engine bolts, or flywheel bolts, they are going to be reused. Of course,
getting a nice set of ARP flywheel bolts wouldn't hurt.
Assembly
Inside :
- Get the manual pedals in there, it is time to cut the holes for the master cylinder and the U-bolt. Bolt the pedals
down so it sits like it will when you are done. There is a template in the plastic (NOT the frame) that will help you
place the pedal framing. Mine was slightly bent, so it had to be coaxed a little so the pedal framing metal would match
up with the template. Once it's lined up the way you like it, drill holes for the U-bolt. Remove the pedal assembly. Look
at your master cylinder and draw where you want to drill your hole. I used a 1-5/8" hole saw to cut my hole - it worked
perfectly. I don't recommend removing the rubber, cut straight through it. When the cutting is done, put the pedals back
in. Bolt it up tight. From the motor bay, put the master cylinder near it's place. Position the resevior so it sits
properly without pinching or twisting the line. I don't recommend letting the slave cylinder hang. OK, lining up the
master cylinder is a PITA. The person inside should pull the master cylinder flush while the person on the otherside
places the U-bolt. You may have some luck pushing the brake booster out some by loosening the four center bolts and
pulling it. Once you've got the U-bolt in, screw the nuts in to hold it in place. Take a look at it and make sure the
master cylinder sits flush with the frame. The master cylinder rod should line up to the clutch pedal. If the hole was
drilled correctly, there should be little gap. If there is, fill it with whatever you feel is appropriate (RTV, whatever).
Attach the clutch rod - use the clip to secure it on the clutch pedal. Attach the brake rod (again, there is a clip) to
the brake pedal and the throttle cable on the gas pedal. BTW, do NOT push the clutch pedal to check it out, you can
damage the slave cylinder. Congrats, another milestone completed.
- It is time to cut the hole for the T56 tranny. There is a plate on the framing that needs to be partially removed.
There are a couple of tack welds that need to be drilled out in order to bend the plate out of the way. You can cut it
off where the three holes are. Put the bellhousing in with a couple of bolts. Get under the car, and dummy install the T56.
Of course, the shifter should be removed. I recommend you use saran wrap or a towel to cover the opening in the tranny.
Bolt up the tranny with a couple of the easy bolts and mount it up with the tranny mount and crossmember. At this point,
you should trace a line around the shifter assembly. It does not need to be exact as the hole will need to be a bigger
anyway. Once you've got the trace done, take the T56 out. From the bottom of the car, drill a couple of holes to help
you guide where to make the cut - go about a 1 - 1� inches outside of the trace you made. The reason I say this is because
you need to have room for the tranny to move and not hit the frame. Get inside the car and use a sawzall, cut off wheel,
or dremel to cut the hole. Be careful not to let the carpet light on fire and wear protective eyewear and clothing. At
this point, I would dummy up the T56 again to be sure the hole was cut right. Use a file to clean up the rough edges and
excess metal.
- Install the steering column and steering knuckle. Attach all the electrical connectors. There are two connectors near
the top of the steering column that are not easy to see when the column is in. This is the ignition box, don't forget to
plug it in!
Outside :
- Install the flywheel, clutch, pressure plate and pilot bearing. With a rubber mallet and socket that fits right around the lip
of the pilot bearing, install the bearing into the crank. Be sure the flat side goes into the crank and the beveled side is
toward the tranny (a gentleman named Brian emailed me to let me know that he installed his backwards and it seized up). It
should be flush with the crank when it is fully in. Try not to touch the inside, it has grease in it. My mechanic told me the amount
that it comes with is not enough and more should be added. Line-up the flywheel and start all of the bolts by hand - get them in as
far as you can with your fingers, then tighten them hand tight in star formation. While someone holds the flywheel with a pry bar,
torque the bolts in a star formation to spec (74 lb/ft). Clean the flywheel and pressure plate surface with brake cleaner to remove
residue and finger marks. The clutch disk has a flat side and a side that sticks out. The side that sticks out goes toward the engine.
Hold the clutch disk in place, and put the pressure plate on. Line up the holes and put in all the pressure plate bolts finger tight.
Use the clutch alignment tool to center the clutch. Tighten all the bolts hand tight in a star formation, then torque them to spec
(22 lb/ft). The pressure plate fingers will look straight when you are done.
- Install the T56. Bolt the bellhousing up and tighten all the bellhousing bolts. Be sure to have the fork t-stud and
fork on the tranny. Pull the fork away from the tranny so it will be out of the TO bearings way. Get the tranny on the
jack and line things up. This part is a PITA. Get the tranny on the bellhousing. You will need about an inch of spacing to
put the fork on. When it is close, push the fork in and be sure it is around the TO bearing. This is a good time to install
the slave cylinder. Push the slave cylinder rod in with your hand until it retracts. Put the rod ball into the fork and put
the slave cylinder in place. This needs to be done somewhat quickly as the slave cylinder will start to extend again. If
done correctly, the fork will stay in place and the slave cylinder ball will be on the fork. Pull the tranny together and
put a couple of easy bolts in. Bolt up the T56, mount, crossmember, and inspection shield. I would highly recommend you
cut the inspection cover so you don't have to remove the starter to install it. If you need to use the tranny bolts to
pull the tranny together, be sure to do this evenly. Note that the top bolts are difficult to get to and will require long
extensions and swivel joints. Remove the fill plug and pour tranny fluid where the shifter would be. Make sure the rear of
the tranny is plugged with either a plug or drive shaft otherwise it will leak out the back. It should take about 3.5 quarts
to fill. When it's filled, install the fill plug and bolt the shifter up to protect the tranny. Congrats, that was the last
major milestone.
- Time to test the assembly on the jacks. Install the drive shaft and bolt it up to the pinion yoke. Temporarily install
your y-pipe so the car isn't so loud. Inside, temporarily connect the 12 gauge brown and yellow wires together (the
park/neutral wire pack near the shifter console). With the clutch in and the tranny in nuetral, turn the car on. You should
be able to shift into any gear (reverse should be difficult) with the same ease as when the engine was off. If it is
difficult to put in gear, the clutch is not fully disengaging. Turn the car off - the system more than likely needs to be
bled. Also listen to see if the starter is working properly. If not, it may need to be shimmed. If everything is OK, try
putting it in first gear and letting the tires spin. If all is well, shut her down. NOTE - I wrote this part, but I did
not do it because I felt a little uncomfortable jacking the pumpkin up while the car was on jackstands. I ended up just
putting the car down and testing it after everything was installed (leap of faith). Do whatever you feel comfortable doing.
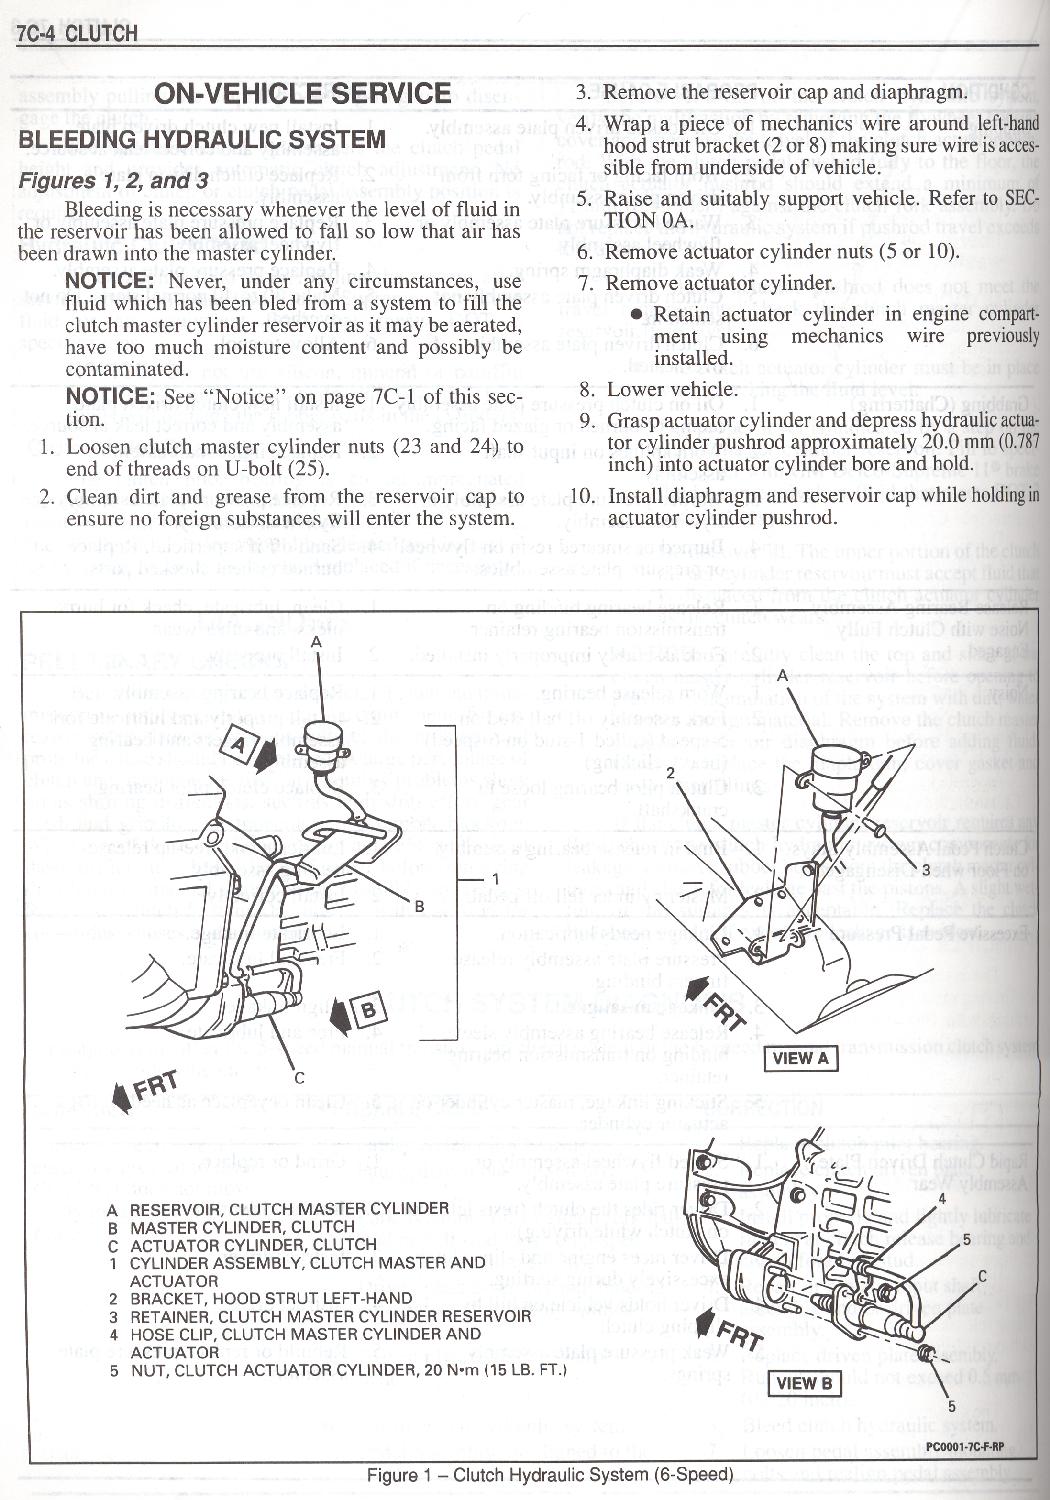
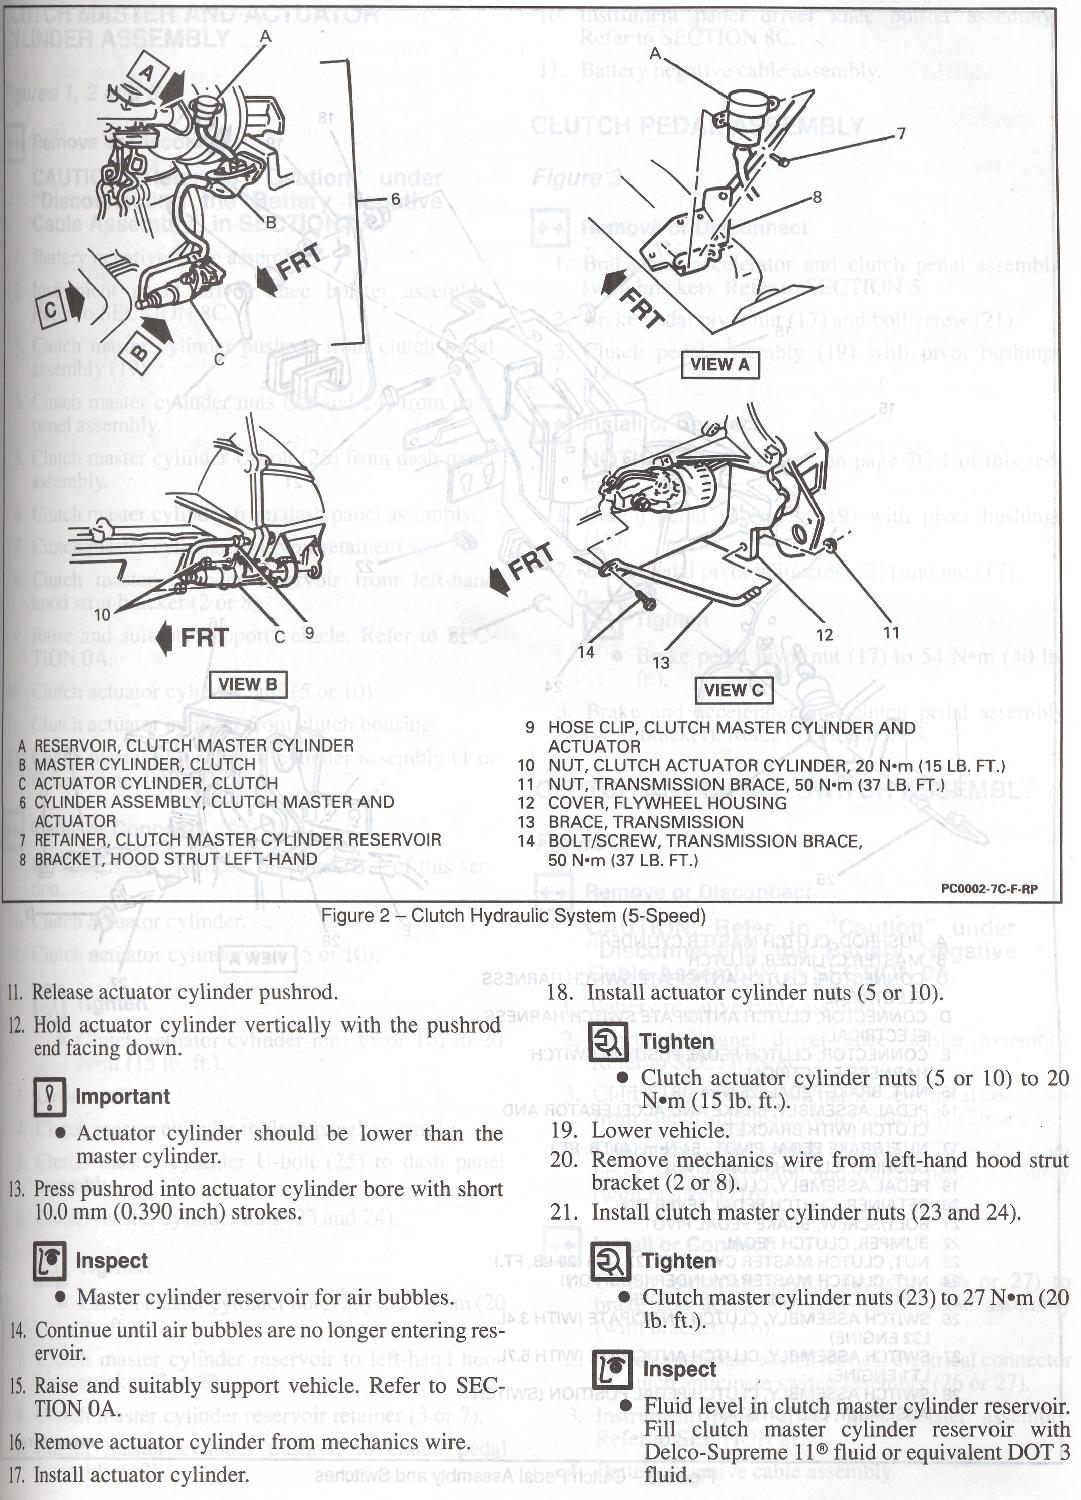
- If you are having issues with the tranny not going into gear or the clutch feeling soft, you may have to bleed the hydrualic
assembly. Here are scans from the Helms manual describing the bleeding procedure - Picture1 and
Picture2.
- Install the torque arm and be sure the exhaust is hooked up and tightened. Don't forget the O2 sensor wires.
- The tranny cooler line plugs need to be plugged in the radiator. What we did was cut the tranny lines and use them to
plug the holes. Whatever will work. You could probably even leave them alone if you wanted to.
Inside :
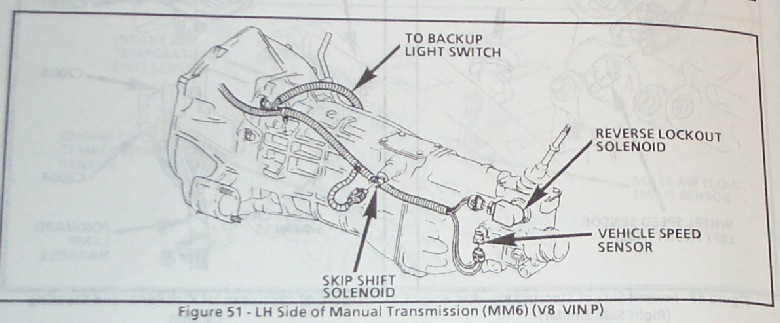
- Time to do the wiring. There are 5 things you need to worry about - brake lights, reverse lights, clutch switch, hatch
release, and VSS. Here is the location of the solenoids/switches/sensors. CAGS and reverse lockout can be ignored. Connect the battery so things can be tested out while you work.
The switch that used to be connected to your automatic brake pedal (with two connectors on it) needs to be installed and
adjusted on your new brake pedal. This controls the brake lights and cruise. With the switch in, the brake lights should
be off, and vice versa. Next, extend the yellow and brown 12 gauge wires and attach them to the black clutch switch. This
will prevent the car from starting unless the clutch is in. Polarity is not relavent here. Next, the 16 guage brown and
green wire needs to be wired to the reverse light connector. Test this first by connecting them together. If the reverse
lights do not turn on, find out what the problem is before continuing. Otherwise, connect them to the reserve light pigtail
which plugs into the driver side connector on the tranny. Polarity is not relavent here. Test this again by putting the car
in reverse and checking for the reverse lights to come on. Next, connect the black w/white stripe and orange w/black stripe
wires together. This is done so you can use your hatch release. Finally, get under the car and cut the VSS connector from
the A4 harness. Wire the new VSS connector in (it is located on the passenger side all the way on the back near the bottom).
I would reuse the plastic tubing as it needs to be weather protected. Polarity is relavent here - the purple wire goes to
A. If you want to wire up the reverse lockout, you will need to tap pin D6 on the PCM (Blue cluster. If you look straight at
the connector with the clip on the right, it is the 6th pin up from the bottom right). Connect this to the B side of the
reverse lockup solenoid. The other side (A) needs ignition switched 12V - you can use the positive side of your reverse
light switch. Noone has bothered to hook up the clutch for cruise control. Just don't push the clutch in when the cruise
is enabled, use the brake to disable cruise. If you really want CAGS (why?), find the white wire in the A4 harness (B13.
Black connector cluster on PCM, 13th pin up from the bottom right if you are look straight at the connector with the clip
on the right) and connect it to the A side of the CAGS soleniod with 12V switched power on the B side.
- Put the carpet back around the pedals, install the lower plastic piece and the knee bolster. The lower plastic piece
has some perforated foam that needs to be removed for the clutch pedal.
- Drill holes and install the lower shift boot. Use short machine screws.
- Install the console, parking brake, shifter insert, and shift knob. When installing the console, there are two lights,
the parking brake wire, and cig. lighter connector.
- Install the seats.
- Take it for a drive! Don't beat on the clutch as it needs to be broken in. If you have a kevlar clutch, do not be
alarmed if it chatters. This will die down as the clutch disk, flywheel, and PP wear in. You may also hear your
TO bearing when the clutch is out, this is normal.
- Note that you will throw a ton of codes and your speedo will be at least 50% low. This can be corrected by getting an
M6 computer program. If you're PCM already has custom tuning for your engine combination, these variables need to be
transferred to a M6 program. LT1_edit and tunercat can do the job. Modern Muscle car and Ed Wright can also do programming.
Shoot, even your dealer can reflash your PCM. The PCM will still set a hidden SES code because of a missing CAG warning light.
No need to worry, as this means it will not illuminate the SES light.
Questions? E-mail me at alex@afrashteh.com.